
In the past, encryption was not as widely used as it is today. Data sent in the form of plain text which is considerably very unsafe. Once the system was compromised, it was so easy for the attacker to take advantage of this loophole.
For any reason, the attackers may implement a variety of techniques to take control of the victim’s computer system or fetch the victim’s sensitive data. One of them is ARP Poisoning or some call it ARP spoofing.
With the abandonment of various protocols that are considered “less secure” as they have no encryption (such as http, telnet, and ftp), this type of attack is becoming less effective.
Nevertheless, ARP poisoning is still a problem and a viable attack vector. The ARP poisoning technique has been the subject of many security measures developed to detect and prevent it, but it is still a popular attack technique because it is easy to execute and can have a significant impact on a network.
ARP spoofing definition
ARP spoofing is categorized as MITM (man-in-the-middle) where the attacker positions himself between the victim and the router by altering the victim’s ARP table and redirecting it to the attacker’s device. The attacker becomes a “bridge” between the victim and the network so that all traffic sent by the victim can be received and forwarded by the attacker.
How does ARP spoofing work?
It has been explained that the attacker will change the ARP table from the victim’s computer to the attacker’s computer. Before that, let’s see what ARP actually is.
ARP is a network protocol for mapping the device’s physical address (MAC address) to an IP address by sending broadcast messages to all devices in a Local Area Network (LAN). These devices will then respond to the request by giving their MAC address to the requestor and then the requestor will store the replies given in a table called the ARP Table.
By manipulating the ARP table, the attacker will act as a router by replacing the router’s MAC address in the victim’s ARP table with the attacker’s MAC address. Thus, the attacker can intercept packets sent by the victim that supposedly be sent to the router. The attacker would then perform a forwarding to the real router..
This is where encryption might come in handy. If in such conditions the victim uses protocol with encryption, even if the attacker succeeds in diverting the traffic, it will be very difficult for the attacker to interpret the data from the victim as the data received will be in the form of an encryption code instead of plain text. Therefore, the attacker needs to somehow decode it to be able to extract the desired data which is quite difficult to do.
Differences between ARP and MAC Table
It should also be noted that the ARP table is often mistaken for the MAC address table. Although both are used to facilitate communication between devices, the fact is that the two are different.
Both serve different purposes. The MAC address table is a table that plays a role in the OSI layer 2 model to map MAC addresses to the interfaces that bind to them (see this post). On the other hand, the ARP table is used to map layer 3 (IP address) to layer 2 (MAC Address). Using a switch you can see the difference by using the command “show mac-address-table” and “show arp”.
ARP spoofing from an attacker’s perspective
See diagram below
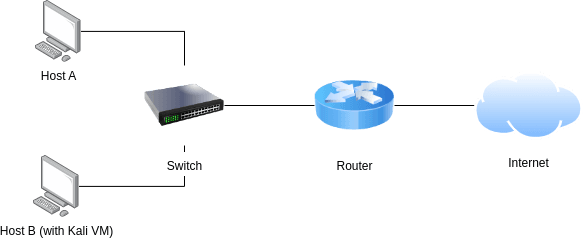
Referring to the image shown above, let’s say that host B is the actual attacking machine or we can assume the host B’s system has been infiltrated by the attacker. By default, the router will be set as the default gateway to connect both hosts A and B to the public network (internet).
By using tools such as Ettercap or arpspoof, an attacker can send a special response to the requestor (victim) which is telling that the attacker’s device is the current default gateway instead of the router itself. At the same time the compromised device also tricks the router so that the traffic for host A will be sent to host B even though the traffic is actually intended for host A.
Using Ettercap
Ettercap is pretty easy to use. Within the network, you can simply run ettercap and choose the “main interface” you want to use. Then, you click the magnifying glass button at the top left of the graphical ettercap interface to scan for hosts.
Once you find all the hosts connected to the network, you can click on “host list” next to the magnifying glass button. Also, there will be two targets: the host and router. To identify the IP address of host A, we can use the “ifconfig” command on host A if host A is using Linux or “ipconfig” if using Windows.
Thus we can already set host A as target 1 by clicking “Add to Target 1” and router as target 2 by clicking “Add to Target 2’. For example, I am using an Android phone as a target with an IP address of 192.168.1.6 and the router is on an IP address of 192.168.1.254.
After that, you can click on the globe like button and select “ARP poisoning”. Another prompt will show, and you can just click “OK”.
Check if Ettercap is running
From the victim’s overview, you won’t find anything odd is happening. Using Kali Linux as an attacker, you can try it by yourself. For example, I can use an Android device as the target (host A). Of course, I need to use the terminal to check the current ARP table. For this purpose, the default termux client for Android will do the job.
If you look closely at the ARP table from the victim’s device, you might find something that is a little bit off. By using the command “arp -a” in termux, you can see that the MAC address of the router is changed to the MAC address of the computer we use to attack. You can check the attacker’s (host B) MAC address by using “ifconfig”.
Even without knowing the attacker’s MAC address, you can see that both IP, 192.168.1.6 and 192.168.1.254 have the same MAC address. In other words, we have successfully intercepted the victim’s network traffic.
If you turn the Ettercap off, by clicking the globe button followed by “Stop MITM attack(s)”, and do the same thing, you can find that the victim’s ARP table is going back to the router’s MAC Address.
Packet forwarding
In order to track the traffic from the victim, the very first thing you need to do is enable IPv4 packet forwarding. To do this, you can uncomment this line by eliminating hashtags like this.
net.ipv4.ip_forward = 1
After that, you can run the command below.
sudo sysctl -p
Now you are supposed to be able to use either Wireshark or tcpdump to track the traffic which will not be covered in this post. However, it is still possible to capture the victim’s traffic by using the Ettercap alone. To do this, simply use “View” from the Ettercap menu button and select “Connections” and double click the packet you want to track.
How to prevent ARP spoofing?
Several ways can be done with the aim of mitigating ARP spoofing or ARP poisoning.
Dynamic ARP Inspection (DAI)
Dynamic ARP inspection (DAI) is a security feature developed by Cisco Systems specifically to address this ARP spoofing problem. Because the ARP spoofing will target routers or switches or any network devices that perform traffic forwarding, this feature is usually implemented for networking devices. To be able to use this feature, DHCP snooping needs to be enabled first.
DAI works by inspecting ARP sent or received packets. DAI will then verify the authenticity of the combination of IP and MAC addresses by obtaining from the DHCP snooping database (binding table).
It is also good to know that the DHCP server is also likely to be targeted by attackers. The attacker can flood the DHCP server with the IP request so that the IP pool on the DHCP server will be depleted. Thus, it can no longer accommodate new clients. The attacker will then provide a rogue DHCP server as a substitute so that requesting client devices will send the discovery packets to this server instead of the real one.
This is where the DHCP snooping plays a very important role. DHCP snooping is another security feature that is able to block offer messages sent by rogue DHCP servers by separating ports into trusted and untrusted categories. Thus, offer packets sent from trusted servers will be forwarded by the switch, while untrusted servers such as attacker’s rogue servers will be blocked (dropped).
DHCP snooping will also create a database or binding table that provides information regarding the port and its binding device based on the trusted and untrusted port classifications. Due to this mechanism, it can filter out the authentic one and not which is extremely useful to create a safer network environment. This is also the reason why DAI requires DHCP snooping to be activated first..
Private VLAN (PVLAN)
Another way you can do this is by using Private VLAN. A private VLAN is basically a VLAN within a VLAN. The advantage of using the private VLAN is that it is isolated to other VLANs on layer 2, yet still able to communicate to other VLANs on layer 3.
If you follow along at this point, you should know that the ARP poisoning is done y manipulating MAC addresses which are at layer 2 of the OSI model. As PVLAN is isolated on layer 2, the MAC address alteration is no longer effective, thus preventing the ARP spoofing technique. However, this approach may not be as effective as it may not be able to protect the router or other device that is connected to its promiscuous port.
Summary
ARP poisoning is a kind of cyber security attack that is capable of manipulating the victim’s ARP table so that the attacker can act as the default gateway for the victim. Acting as a man-in-the-middle, the attacker is able to fully manipulate packets sent and received by the victim, which will be very dangerous if it is related to the victim’s sensitive data. To mitigate the risk, implementing security measures such as DAI and PVLANs may be useful for defending the network against ARP poisoning.